Thursday, May 8, 2014

She's About to Pop Party

My speech assistant was pregnant with her third child. (I am a little late in posting this as she has had said child and is now enjoying a lovely break from school whiling away the hours taking care of three little ones under the age of four.)  I wanted to give her a fun send off at school so I created the "She's About to Pop" popcorn bar.


 I bought pre-popped popcorn from Gordon Food Service.  I purchased various kinds of popcorn salt from my grocery store and Big Lots and then transferred them to Dollar Store salt shakers.
 The banner I made by printing out flags on card stock and scrapbook paper and stringing them on Baker's twine.  Here is an easy tip another teacher gave me as I was trying to get the banner to stay up.  She suggested I hot glue it to the brick.  It worked like a charm and it came off super easy.
 The small signs were also done on card stock, printed and then cut out.  Again I googled tag templates and just added my own labels.  I tied them on with baker's twine as well.
I made the pinwheels from a template I got from Googling pinwheels.  To get the two pattern look, I glued two different scrapbook papers together and then cut them out.  I hot glued a button in the center and hot glued them to kabob skewers.  I made the popcorn balls the night before.


I went with the red, black and whet theme because that was color of the enamelware that I had.  (I am sure that is what the professional stylist do...right?)  All in all it was really pretty simple to throw together and it came out so very cute.

Patty

Tuesday, May 6, 2014

City Wide Garage Sales -The Great White Sale

Call me Ishmael.  You know when you are out thrifting whether it is at an estate sale, a thrift store, flea market or garage sale and you have the deep hope that you are going to find the sale of all sales? You know the kind I mean.  The kind you read about in magazines like FleaMarket Style (where they never print the prices...I always suspect they pay a lot more than I would ever pay.)  You know the kind where someone is cleaning out their attic and just wants to get rid of stuff.  Well, we hit one during the city wide garage sales.

After trolling through countless sales with baby clothes, afghans and a thousand candlesticks and bad eighties decor, we drove by this driveway that had one table and lines of boxes up and down the cement.  It didn't look promising, but my daughter-in-law said we should stop.  At first we saw a few things and then my daughter-in-law started digging through the boxes and oh my...things got real fun.

The homeowner didn't have very many prices on things and when I inquired about a lamp, he said the words every hardcore thrifter longs to hear.  "Just make a pile and we will work something out.  I made a pile and he charged me a whopping $5.  That's right.  Five whole dollars for this pile of fun.
 As per my last post, my son took the pictures...a little more artistically than I would have.
 I would have paid $10 for the lamp.  My husband isn't too sure about it, but my daughter-in-law and Thrift Chick both said, "I can see you spraying that some fun color....they got that right.
 These are Pyrex tear drop measuring batter bowls.  I usually don't buy clear pyrex.  However, my daughter-in-law unearthed them in a box and we both thought they would be quite useful.  Turns out they are also quite vintage and single pieces of them go for $15-$20 on Ebay.  I saw a few full sets for the $40-$50 range.  I just like how much use I am going to get out of them.
 The enamel pot was filthy.  It is amazing what a magic eraser can do.  I have a growing collection of enamelware.  However, I have never paid more than $1 to $2 per item.  I actually saw some enamelware at some other sales for $15 fa piece.  Some day I will do a post about how I started getting enamelware when I didn't actually like it!

 Okay the Pyrex gravy boat and saucer is not all that vintage because it has microwave instructions on the bottom.  I just liked the look of it.  I actually collect the red translucent vintage cookie cutters and put them on my white Christmas tree (see it here)  My mom used cookie cutters like these so I threw them in my pile.  I am sure I will find a use for them.  The flocked vintage Santa was a piece I threw in at the last minute.  I couldn't think of how I would use him, but he reminded me of my grandmother's decorations.  Thrift Chick said "He's cool in a real creepy sort of way."

There was also this vintage small casserole dish in the browns and harvest gold of eras gone by.  I forgot to have my son take a picture of it, but you can kind of spy it in the top picture.

If you divide up the $5 total by pieces, each item cost me less than $1.  Now that is a "Great White Sale" for ya!

Patty

Sunday, May 4, 2014

City Wide Garage Sale

I am not a fan of blog posts where people post their recent thrifting finds.  After all, it is not like it is going to inspire me....more like make me wish I lived in an entirely different state.  However, I had such a great haul at our city side garage sale days that I feel the need to share.  Outside of Thrift Chick, no one else in our family really gets it.
This year Thrift Chick had an out of state funeral to attend so she missed out, but my daughter-in-law stepped in.  My lovely daughter-in-law had never been to a flea market until she started dating my son.  She is a fast learner!  She was a great companion.  She was on the hunt for preschool clothes and kid games.  However, she is also is very knowledgeable about kitchen items and has a great eye.
This lovely plastic pitcher set cost me a whole quarter.  I bought them for Thrift Chick's apartment.  She has this whole vintage vibe going and was in need of some display items.
 I have this thing for old thermoses.  I think it is because I carried my lunch to school every day with a lunch box and thermos.  It was the highlight of school shopping to pick out a new lunch box.  These were $2 and have also found a home in Thrift Chick's apartment...but they will be back home soon.
Whenever I see pyrex in vintage colors I pick them up.  I will post about our growing collection of pyrex.  However, we have two rules.  One is we use the pyrex.  If it is not usable, I don't want it.  The second is we refuse to shell out big bucks or antique store prices.  These two were just $2 each.

About a year ago, Thrift Chick picked up four Apollo 13 glasses at a Salvo.  She thought they were kitchy and fun.  She paid 50 cents a glass.  Turns out that many people sell them on Ebay for around $3 a glass.  I came across some also for 50 cents a glass.  They also had Apollo 12 glasses so I picked up some of those as well.
Lately I have had a thing for old textiles.  I don't know why.  Thrift Chick uses vintage 50's era ones in her kitchen.  I mostly have them stored away.  I think I like them because I know someone long ago sat down and hand stitched them....that kind of effort is worth more than $1 but that is what I paid for the two towels (which also came with a bunch of handkerchiefs to add to Thrift Chick's collection) and $1 for the tablecloth.
I also picked up these old skis for $8.  My family laughed, but they will be a part of the Christmas decor.  However, if we have another winter like this last one, they just might be how I get out of my driveway!

I also picked up other miscellaneous things like a toy box and new toys for the grandchildren as well as a dog cage.  You know the everyday things you need, but gasp at the retail prices...that is what garage sales are really for!

Stay tuned for one more post on the city wide garage sales.  I hit one sale that deserves its own post!

Patty

Disclaimer:  My son took these photos for me.  He has a real artistic eye and takes some amazing photos....so that is why some of these are less about getting a good look at the haul and more about the cool angle.  However, since they don't have the bad lighting and fuzziness I tend to end up with, I will take them.

Saturday, February 15, 2014

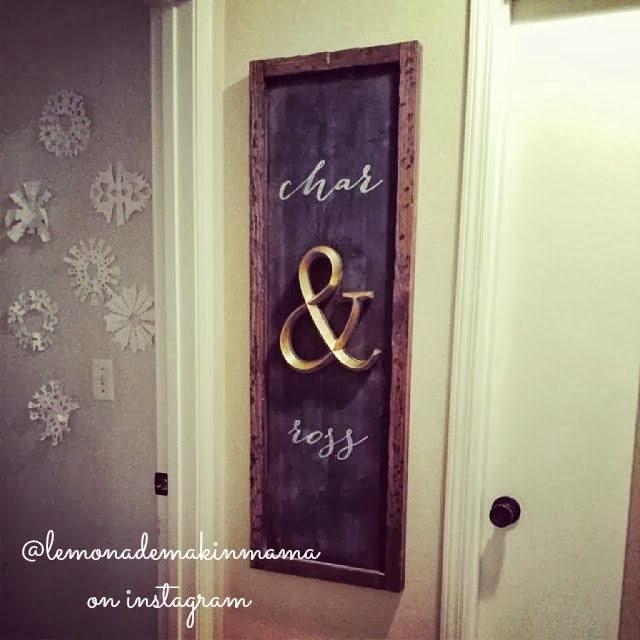
Chalkboard Cheats

Both of my SLP-A and SLP-CFY girls are pregnant so I decided to throw a little announcement party at school for them.  I wanted to make it look nice, but I didn't want to spend an hour writing, erasing, writing again, wringing my hands, erasing, writing......   Instead I did this little cheat.


I created my "chalkboard" in Publisher (you could use Pages, Photoshop or whatever program you use)   First I downloaded a bunch of free chalkboard fonts.  Just google free chalkboard fonts and choose your favorite site.  I then searched for chalkboard backgrounds in Google images and downloaded that.  Choose an image that is really smudgy to give it an authentic look.

I opened up a file in Publisher and started out by adding a picture of the chalkboard background I downloaded.  I enlarged it so it covered the entire page.  I then started adding text using a white color and in the various chalkboard fonts.  I added the designs by creating them or getting them from the internet and setting their color to white.   I printed it off and taped it in my frame.

Pretty cool.  You can't believe how many people complimented me on my handwriting.  Our secretary said she loved it but she could never write that beautifully.  I laughed and told her to take a closer look.

I am just one of those people that is never satisfied with my final product.  This was a much easier way to make a simple sign!

Patty

Chalkboards and Cheating

I do love the look of all the beautiful lettered chalkboards out there in blogland.

From the truly complex: 

to simple:

I decided to try one of my own.  Most of my looked like a third grader did it (and I sincerely apologize to third graders everywhere.)  I started to research and found out many people use a bistro chalk marker like this:  
That solved some problems, but it did not solve them all.  I improved to about the level of a fifth grader.   I still erased about about fifty times and had a definite downward slope.  I then decided to do the old pencil on the back transfer trick.

I created a template on Publisher that I liked thought I could do.  I printed it off and then took a pencil and covered the back with solid scribbles with a pencil.  I then placed the paper with pencil side down on my chalkboard and traced over my design.  I then a had a very faint line to follow with my chalk board.  Here is my finished product:
Not too bad.  I only erased three times and it lasted all season so I consider it a success.

However, if you think even this is too much work, stayed tuned, I have a really neat cheat for you.


Patty

Tuesday, January 28, 2014

Winter Scenes 2014

One of the most pinned things from our blog is our winter decor from two years ago.  I thought I would update it.  I never in my life changed out my decor until I started thrifting.  In fact I've had a strong loathing for knickknacks, gewgaws and tchotchkes since I was a child.  My mother never met a souvenir or memento that she didn't feel the need to display.  Dusting as a child was an unbelievable chore.  Consequently, I've never had a lot of stuff laying around.

Flash forward to getting bit by the thrifting bug and all of the sudden I have cupboards full of cake plates, vintage silver and vases.  Now, I change it up every season.  I get bored very quickly so things change a lot.

Right now we are in the middle of the endless snowpocolypse and polar vortex.  I have been out of school more than I have  been in.


I have a serious case of the winter blues and didn't really have a whole lot of inspiration this year.  I didn't even take down my outdoor Christmas decor because it was just too cold and snowy.
  
So my winter decor inside is not all that different except, I developed a slight obsession with pine cones.  I liked their rustic texture next to my tarnished silver.  Also, they are in abundance on our property so they are very cheap.   I am not in love with these looks.  I abhor crafty crafty stuff and all this feels a bit contrived to me, but it is what it is this year...winter is just not thrilling me this year.

 Everything on the mantle is from a thrift store or garage sale except the wooden reindeer.  My late father made it during his wood working phase.  When my mother was moving and cleaning out a few years ago, she had it in the "give away" pile, but my son rescued it saying that it could not ever be given away.  It has been stuck in a cupboard for about ten years so I decided to use it this year.
 I have quite a few blue mason jars.  I have been incredible lucky at finding them at thrift stores and garage sales.  My latest acquisitions were from a garage sale being run my a man (I don't think he knew what he was selling.)  They are harder to find now as everybody wants them.


I hope you are someplace warm and sunny.    By the way, my goal for this year is to learn to take better photographs!  I am not going to say my pictures are crappy because of the time of day or sunlight.  My pictures are crappy because I have a good camera that I have no idea how to use.


Patty


Friday, January 24, 2014

Grain Sack Pillows

I have always loved the look of vintage grain sack pillows.  The simplicity and clean lines are what I have love.  Every time I see this picture on The Lettered Cottage, I covet the pillows.

The burlap pillow came from Pottery Barn.  I couldn't find it anymore, but one very similar was on sale for $30.  That just makes me gasp....I think $10 for a pillow is pricey. (I know...cheap, disgustedly cheap)  I decided to make my own.  It took two tried, but I am pretty pleased with my final product.   

But let me start at the beginning with try number one.  First I hunted and hunted for burlap.  I found it everywhere, but it was rough with a very open weave.  I just didn't see it making a great pillow.  However, I forged ahead.  I cut out my pillow, taped off some lines and painted some red stripes.  After sewing and adding buttons, I had a pretty good imitation....but like I predicted....
 ...it was rough...
 ...it snagged easily...
...and was generally just too rustic for my tastes.

I thought I would look up vintage grain sack textiles and maybe invest in one or two to make a pillow, but holy cow are they expensive.  Nope, I could not do that when I knew my family was going to toss it around and my dog was going to sleep on it.  So back to the DIY drawing board.  This time I decided to use some leftover canvas drop cloth I had.  (Drop cloth is super inexpensive and you get tons.)  This time I decided to go at a different way.

After cutting out my material.  I cut strips of freezer paper in the widths I wanted.  (Tape was too thick and trying to thin the width by cutting it was impossible.)  I ironed the freezer paper onto the material.  (Did you know that freezer paper can be ironed onto material for a stencil?  It is awesome.)


I then used a red Sharpie to fill in the lines.  It went very fast.  I also learned not to stop but to work quickly to avoid stoppage marks.
 I peeled off the freezer paper and I had my imitation grain sack material.


I sewed it, stuffed and added some buttons.  I love how they came out.  I love the crispness of the strip and the clean look they have.  My family also loves how they feel.


Altogether I paid less than $5 for two pillows.  The drop cloth cost about $10 for about 12 feet of great material so material for these pillows was really just pennies.  I buy pillows for around -$1-$2 at thrift stores for the stuffing and pillow forms.  The buttons came from my stash.  I probably paid the most for the Sharpie marker ($3)   I have no idea if the Sharpie will fade if I wash it, but in all reality I will probably tire of the pillow before I need to wash it!

Patty